Tuesday, February 18, 2014
Sweet Green
Sweet. Refreshing. Slightly thick from the over-ripe pear and apple. Filling.
PERFECT! AND, my favorite color of green!
Sunday, February 16, 2014
Juice Feasting
I have several "go-to" juices that I find travel well in my small cooler with ice packs and bottles of water.
V-8 (or 9, or 12 - depending on what's in the veggie stash in the fridge…)
All ready to process: 12 carrots, 8 stalks celery, 3 large stalks bok choy, 1 large tomato, 1 peeled cucumber, 1 lemon, 3 cloves garlic, big handful cilantro, and 1 seeded jalapeño. I have found this juicer most efficient and faster if I cut the produce into chunks, rather than try to push things through whole. Just takes a few more minutes to prep, I have it down to an art and a science now!
My newest juicer, the Jay Kordich Power Grind Pro, makes short work of the veggies. This is a hybrid juicer, with a grinding process before the centrifugal forces push the ground pulp against the spinning basket which separates the juice from the insoluble fiber. Wonderfully fresh, non-pulpy juice! Two quarts, ready to go into jars.
The pint jar is Mean Green: 2 cucumbers, 8 stalks celery, 4 apples, 8 large kale leaves, 1 lemon, and a 2" knob of ginger. There WAS a quart of it - I drank the other pint for dinner as I put the rest of the juice into the refrigerator!
So there is tomorrow's lunch and dinner, all done in one session with only one time clean-up! It only takes about 90 seconds to clean and re-assemble the juicer, but I usually don't have time for three juicing sessions a day. So this works for me, and ensures I have the juices I need to keep me Juice Feasting all day with no fuss.
All clean, ready to go for the next juicy session. These two machines are my life-line to better health: the powerful juicer, and my beloved VitaMix! Buddies!
Sunday, September 29, 2013
Where's the BEEF?
HOWEVER ~ this version satisfies in every way, with taste, texture and true southwest Arizona-style flavors!
The original recipe listed " corn chips, crumbled". I prefer to avoid processed oils, and fresh dehydrated chips are so easy... thinking and planning ahead, I started the process the day before, making dehydrated Corn Kale Chips. You don't have to have a dehydrator, the chips can be oven dried - lowest setting on a convection oven works well, with careful monitoring towards the end. However, from experience in making crackers, I have to say a dehydrator makes life easier, producing a crisp tasty end product with less handling and NO potential of blackened mystery "things" on the baking sheet! (they are scary, trust me...)
Corn Kale Chips
Puree' in food processor:
2 c. corn kernels (fresh or frozen, thawed)
2 cloves of garlic (or more, if you love garlic like I do!)
juice 1/2 lime
Put into mixing bowl. In processor, puree':
2 c. corn kernels (fresh or frozen, thawed)
1-2 tsp. taco blend seasoning
1/4 tsp. sea salt
Add and pulse blend:
2 c. kale, chopped
Add to bowl and stir well.
Spread batter about 1/4" thick on teflex dehydrator sheets; score with knife or pizza cutter.
Begin drying process at 145 degrees for 1 hour. Reduce heat to 115 degrees, for 8-10 hours. (I time dehydrator projects so the longest drying time happens during the night) Flip teflex sheets over, peeling off chips onto drying screen upside-down. Continue drying to very crisp - about 4 hours or more.
Serve warm for a real flavor treat! Store cooled chips in airtight container.
Vegan Taco Salad (serves 1 generously, or two smaller portions)
Taco Beans
Simmer 2-3 minutes in small fry pan:
1/2 small onion, coarse chopped
3 T. water
Add:
1 c. rinsed canned garbanza beans (or just use the whole can!)
1 tsp. taco blend seasoning (make your own!)
Cook uncovered 2-3 minutes until mixture is hot through.
Guacamole
Mash in small bowl:
1/2 large (or two small) avocado
Stir in:
1 T. onion, finely diced
1 large clove garlic, minced
1-3 T. fresh cilantro, chopped
juice 1/2 lime (or 1 whole if small)
sea salt and fresh ground pepper to taste
Arrange in salad bowl:
2 c. chopped romaine
1 tomato, chopped
Taco beans
scoop of guacamole
top with crumbled corn kale chips
Left-over guac (ha!) can be frozen in a snack bag - prevents darkening, and thaws quickly. The taco beans keep well for several days refrigerated; they are good as a quesadilla filling, too.
I went through several days of really craving and enjoying a variety of South West flavored dishes, this was my very favorite!
Light and Bright
LIGHT & BRIGHT
1 beet (yellow if possible, red works)
1/2 grapefruit, peeled
1 summer squash (yellow if possible, or a zucchini works)
1/2 cucumber
1/4 head SMALL green cabbage
1 apple (or firm pear)
1 small handful fresh mint leaves
Wash the fruit and veggies: fill sink with cool water, stir in 1-2 T. unprocessed sea salt and juice of one lemon. Wash produce with small soft veggie brush.
Peel grapefruit and beet, and cucumber if it is waxed (buy organic - no wax!).
Cut produce to fit your juicer.
Juice and enjoy!!
Grapefruit has a refreshing slight bitterness. If that isn't your cup of tea, substitute an orange, peeled.
Substitute 1/2" of fresh ginger root for the mint, for a totally different zing!
Don't be afraid to get creative with a recipe, let your taste buds tell you when it is "perfect". Make notes so you can have the same yummy juice again!
(basic recipe and photo courtesy Reboot With Joe)
Sunday, July 28, 2013
Avo-Mango Pudding
Monday, July 15, 2013
CRACKERS!
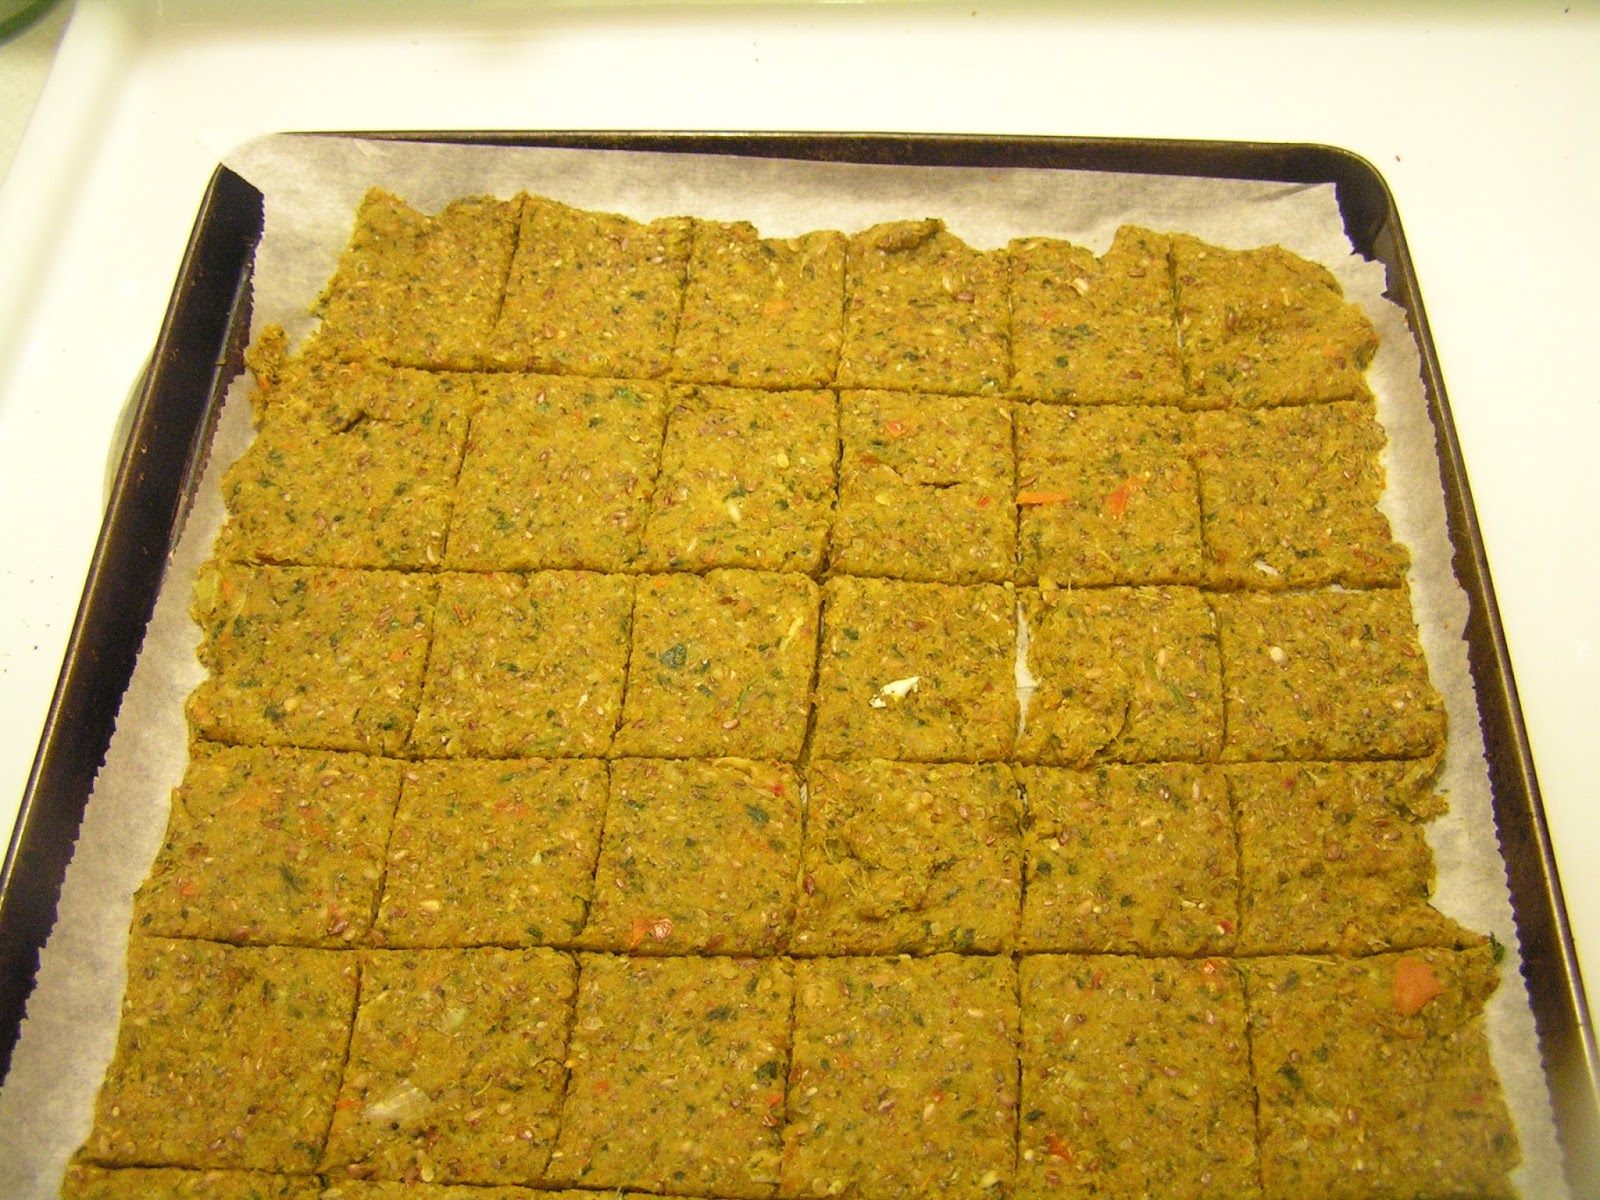
I love making dehydrated crackers and flatbread - so of course, my mind is going "Crackers, silly girl, CRACKERS!!!"
It took some tinkering, but this batch of pulp-based yummies were worth the time and effort. Which actually wasn't much, truth to tell. So here are the "Cliff Notes" on Project Pulp:
I had a batch of "green" pulp from the previous day bagged and refrigerated in anticipation of this experiment. After a nice big glass of carrot-beet-celery, etc juice for breakfast, I also delegated that bag of carrot-based pulp to the kitchen lab in separate from the green pulp. Labs are for experiments, remember high school chem??
The green pulp was much more fiberous - thanks to a full head of celery down the chute. It went into the food processor for some further breakdown of those long stands - with some water, lemon juice, and lime juice to get the mass moving and working the fiber strands into shorter lengths.
The carrot pulp didn't need the extra help, it went directly into the mixing bowl, along with ground flax, some spices (coriander and a nice new curry mix), and Bragg's Liquid Aminos (my pantry was out of Nama Shoyu - now on the shopping list).
After mixing and adding water, small amounts several times, tasting and adjusting seasonings, the "batter" was finally deemed ready to spread. Because I was prepping for a class, I opted for the low oven drying, not my ideal, but OK if you don't yet have a dehydrator or are pressed for time (note to self: plan better next time, leave time for dehydrating!)
Using parchment (or Silpat if you are lucky enough to have some sheets just lying about doing nothing useful), I spread the cracker batter about 3/8" thick - that is NOT easy. I'm going to invest in an off-set spatula, like the pro cake decoraters use - great for spreading FLAT stuff. Scored with a sharp knife, then into a 275 preheated oven, middle rack.
After about 90 minutes, the crackers were flipped onto the bare cookie pan and the parchment gently peeled off. Back in the over for what turned into several hours. Low is slow, but better, remember?!
The final results had some thick and thin spots, which made crispier and chewier crackers - some were removed from pan when crisp, others left in longer to get the results I wanted. It took some shepherding, I didn't let myself get distracted by my toys because even 10 minutes in an oven operation can be the difference between tasty or too toasty!! That doesn't happen with a dehydrator, there is a lot more leeway between done and overdone...just sayin'.
Monday, July 1, 2013
Pizza Pizza!
A large Portabella mushroom cap makes a chewy-yeasty base for traditional toppings - well, almost traditional...
Some meaty-textured chopped mushrooms take a 10 minute swim in a simple marinade of 3 T. Bragg's Liquid Aminos mixed with 2 T. agave, a squeeze of lemon juice and a couple cloves of garlic, minced.
While the mushrooms are soaking, prepare the large cap by popping off the stem (chop it up and add to the gang lolling in the marinade) and gently scoop out the dark gills with a spoon. Then chop, dice, mince, and otherwise prepare whichever veggies are calling your name. You know - the usual pizza volunteers: sweet bell peppers, sliced tomatoes, chopped green onions...
Drizzle some lemon juice all over the inside of the cap. Spread a tablespoon or two of raw almond butter or tahini in the cap.
Layer the veggies, then top with the marinaded mushroom bits. A generous sprinkle of nutritional yeast adds lots of B12 and cheesy flavor. Lastly, a crown of basil chiffonade.
Slice your creation into wedges, and enjoy the fresh flavors!
You will never go back to the heavy bread version.
Saturday, April 13, 2013
Hummus a tune, Carrot!
For this raw version, I first sprouted the garbanzos (also known as chickpeas) for 3 days, then lightly steamed them just until they were tender, quickly cooling them under cold water.
Then into the processor! Some carrots jumped in, along with a bit of olive oil, lemon juice, several cloves of garlic, cumin, and seasalt - SO SIMPLE:
Here's CARROT HUMMUS:
Hummus is a base for a variety of add-ins, such as chopped parsley or cilantro, peppers (hot or sweet), maybe some diced pineapple...live it up! Here I used the sweet peppers as dippers, with Plain Jane carrot hummus - it really needed no embellishing, letting that carrot flavor shine.
For lunch, I used the rest of the batch of garbanzo beans to make a bean/avocado mash-up, with garlic and cilantro - another simple but simply delish raw spread! On grainy bread, what a treat! Just to make it feel special beside that yummy hummus, a topping of fresh alfalfa sprouts and a tiny dab of colored pepper - a super open-face sammie!
A fresh pineapple/spinach green smoothie rounded out my patio lunch - umm umm!
The only thing as fun as growing my veggies, greens, and sprouts, is eating raw foods that make my heart sing!
Sunday, March 10, 2013
Simply Raw
Eating "raw" is the perfect example.
OATS 'n APPLES breakfast on my sunny Arizona patio:
That's it. A simple "Garden of Eatin' " breakfast: chewy sweet oats, crisp juicy apple bites, snappy mellow walnuts...
a simple meal that will keep you going for hours.
Sunday, June 10, 2012
Noodlin'...
This evening the first to raise their hands and become the WINNERS, were the cherry tomatoes in the basket on the counter and the last zuchinni in the frig. Plus a surprise ingredient from the pantry...
So here's how the collaboration went: First the zuch went through the spiralizer (LOVE that gadget!). Into a broad "soup bowl" with some chopped scallions. They felt like a swim, so a quick marinade was poured on top for them to swish around .
Marinade: shake in small lidded container 1 T. EVOO (extra virgin olive oil), 1/2 T. agave, juice from 1/2 lemon, 1 tsp. tamari, minced garlic.
Let the gang swim for a bit, maybe 20 minutes or so. The noodles soften a bit, sorta 'al dente.
Then the 'maters were halved and placed around the pile of noodles. A quarter of a cucumber was screaming, "I'm going to waste, USE me!". So I did. Another layer around the edges. Starting to see a sort of mandala salad pattern forming...
Now the real fun begins! Every bite becomes an artistic arrangement on the fork...
That pool of marinade in the bottom of the bowl is pure yummy goodness. When the last noodle was slurped, the last cuc crunched - I tilted the bowl and drank the marinade! I know, uncouth. But who's watching!
Thursday, June 7, 2012
Zuchinni Pasta with Basil Shrimp
With fresh basil from my indoor potted garden ('cuz it isn't warm enough for my babies to make it outdoors yet - silly weather...) and my handy spiralizer, this dish comes together quickly with a zing!
Ingredients:
one smallish zuchinni - about 7"
one tomato, about 3" diameter
1/2 lemon (smallish, not large)
1 garlic clove (large as you like)
4-5 fresh basil leaves
1/2 c. fresh shrimp meat (not the prawns)
Procedure:
Peel zuchinni. Cut off ends, then spiralize for "noodles", or cut into thin strips with a veggie peeler. Put "noodles" into wide bowl.
Use the core and end off spiralizer (or about 2" of the zuchinni before making "noodles") plus some of "noodles" - enough to make about 1/3 c. total, and put into blender.
Add tomato, cut into quarters; peeled coarsely chopped garlic; juice from 1/2 smallish lemon; 2-3 basil leaves (keep 2 for garnish) and blitz until smooth.
Taste sauce - I added about 1/16 tsp. stevia to cut the heat from the garlic and acid tang of tomato and lemon. This is strictly to YOUR taste, adjust as you want! It's got zing, doesn't need salt.
Proclaiming "yummers!", pour sauce over noodles. Top with rinsed shrimp, and basil chiffonade from remaining leaves. Let set for 5-10 minutes at room temp, to marry the flavors.
While this isn't a bright red tomato-y sauce, it carries the flavors well. If you want a "creamier" type of sauce, add 1/4 soaked cashews to the blender with the rest of the sauce ingredients, whiz smooth.
Friday, October 7, 2011
Supreme a Grapefruit!
Using a SHARP knife, cut both ends off the grapefruit, make sure to get to the "meat". Then holding it sort of on edge, start at the top and cut down around to the bottom. This takes a tiny bit of practice, but isn't difficult.
Sunday, August 7, 2011
Protein Boost
I really like Manitoba Harvest hemp powders. The processing is done without heat, preserving all the nutrients of powerhouse hemp. Texture is a tiny bit grainy but not really noticable in amidst the greens and fruits.
I order the hemp seeds and powder directly from the source in Canada, although I have found a few "local" (over 50 miles away) healthfood stores or herb stores that do carry Manitoba Harvest products. The small shipping cost more than offsets the price of gas, which is another reason to mail-order!
Explore several types of hemp products (seeds, oil, powders) at http://manitobaharvest.com/. They have really good sales and promotions from time to time. A quality company, great service!
Monday, August 1, 2011
Green Cleaning - with a hint of Yellow
I like to EAT green! I use a lot of fresh lemon juice, so there are those nice yellow rinds left over. One can eat only so much grated lemon zest.
Here's the perfect "GREEN" solution: clean the garbage disposal using the lemon rinds!
I cut up the rinds into 1-2" pieces, keep them in a little bowl on the sink. A couple times a day, several go down "George the Gobbler" to keep his gullet clean and smelling like - well, lemons!
Cleaning Green was never so easy. Or so Yellow.
Friday, July 29, 2011
Bless my Bones!
The handful of recipes are balanced, tasty, practical. It's an education just reading the menus and recipes!
Here's one of my latest forays into summery salads using greens fresh (ultimate gourmet!) from our garden:
The recipe is titled: Build-Your-Bones Salad . (I modified the assembly.)
Toss in large bowl: 2-3 c. EACH thinly sliced kale and/or collard greens, chopped napa cabbage, chopped broccoli florets, thinly sliced red cabbage
Put greens mix into one of those green veggie keeper bags to store in frig.
When ready to have a yummy lunch or dinner, put torn romaine into your salad bowl, add big handfuls of the crucifer mix. Top with chopped red peppers, and optionally, some chopped peeled cucumber and tomato. This makes huge salads, filling and oh-so-lovely and nutritious!
By keeping the crucifers and romaine separate, the base mix will last longer, and the lettuce won't get ugly! This makes a pile of greens, you can eat out of the bag all week - a blessing for those who are working and come home famished!
I chose, from the 8 dressing recipes, Liquid Gold dressing.
Blend well: 1/2 c. EACH flaxseed (or hempseed oil), fresh lemon juice, water; 1/3 c. nutritional yeast flakes; 1/4 c. tamari; 1-2 T gound flaxseed; 2 tsp. Dijon mustard; 4 tsp. maple syrup or other sweetener; 1 tsp. cumin.
Store in glass jar in frig for up to 2 weeks.
I also sprinkled on a couple tablespoons of Nama Shoyu Crunchies:
Soak 4-6 hours 2 c. sunflower seeds, pumpkin seeds or almonds, or a MIX of them. (NOTE: you don't HAVE to soak them, just improves amino acid balance and gives lovely texture.
Drain well. Put in bowl, sprinkle with 1 T. nama shoyu or tamari, stir to mix well. Spread evenly on mesh sheets on dehydrator trays. Dehydrate at 105 degrees for about 12 hours, or until crisp. Stored airtight in frig or freezer, they'll keep for about 6 months.
Although why anyone would let 2 little cups of these yummies hang around that long is a mystery to me...
Friday, July 15, 2011
Minty Good Morning!
I really like this one, have it often right now, because the mint is rampant in the herb pots and borders.
In the VitaMix: 1 banana (frozen or not), 1 c. fresh pineapple (frozen or not), about 2 c. spinach, and the star of the show: 2-4 nice mint leaves depending on your minty taste buds. Blitz smooth, and ENJOY!